Monday, October 31, 2011
[Video] Takes Two To Tango
My friend Silas has created yet another masterpiece, this time a pre-wedding video for our friends Jim and Agnes. Exe Crew came together to make this a reality under the direction of Silas. I played the role of the president's bodyguard and it was hilarious and great fun to produce. See the video page for a full description of concept, but in the mean time click Play and enjoy.
Saturday, October 15, 2011
Crack whores - Part II
Well, it's happened again; not as bad as last time, but the Project μ SCR Pro rotors are still cracked nonetheless. After two track days, cracks developed from the holes where the rotor bolts on to the hat. Then on their third track day at Sandown, I could feel a vibration through the steering wheel under hard braking. The uneven surface around the cracks also took small chunks off the edges of the brake pads.
This is the left rotor with three noticeably large cracks. The right rotor also had a couple.

Close up view of the cracks:


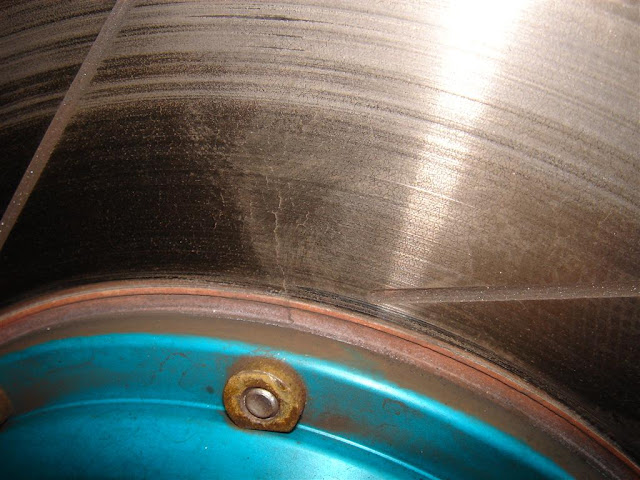
From inside the rotor, you can see where the cracks started.

The rotors had only worn down about 0.25 mm and they still performed fine on the road, but with more track days coming up I had to replace them. Instead of paying a premium on a brand name rotor again, I decided to try a set of rotors by X3E Motorsports. These rotors are apparently hardened and more resistent to wear, lets see if they can withstand cracking. Thanks to JimJim for recommending these to me as he uses a set on his Evo.

They weigh around 7.5 kg each, so they are roughly 500 grams heavier than the Project μ. As a comparison, these are the weights of other rotors:
DBA 4000: ~8 kg
DBA 5000: ~7.5 kg
Project μ SCR-Pro: ~7 kg
I'll also be working on my cooling for the brakes to mitigate the effects of hard braking on the track.
This is the left rotor with three noticeably large cracks. The right rotor also had a couple.

Close up view of the cracks:


From inside the rotor, you can see where the cracks started.

The rotors had only worn down about 0.25 mm and they still performed fine on the road, but with more track days coming up I had to replace them. Instead of paying a premium on a brand name rotor again, I decided to try a set of rotors by X3E Motorsports. These rotors are apparently hardened and more resistent to wear, lets see if they can withstand cracking. Thanks to JimJim for recommending these to me as he uses a set on his Evo.

They weigh around 7.5 kg each, so they are roughly 500 grams heavier than the Project μ. As a comparison, these are the weights of other rotors:
DBA 4000: ~8 kg
DBA 5000: ~7.5 kg
Project μ SCR-Pro: ~7 kg
I'll also be working on my cooling for the brakes to mitigate the effects of hard braking on the track.
Sunday, October 2, 2011
Bulls eye!
My windscreen sustained a bulls eye crack from a rock at the recent Sandown track day. I think it was flicked up by the stupid unyielding MX-5 race car.

So I bought one of these kits to fix it cheaply. The kit basically consists of a tube of resin and a syringe to apply the resin to the affected area. The video at the link above shows the process for repair.
Here's the application of resin in progress.


After the syringe is removed, a drop of resin is applied to cover the hole and the curing strip placed on top.

The view from inside the car, the bulls eye is filled in by resin but as expected, there are still visible parts of the crack.

The Gorilla sits in the sun to allow the UV to cure the resin.

After the curing strip was removed and the excess resin cleaned up, some parts of the crack are still visible but it has been completely sealed by the resin.

Subscribe to:
Posts (Atom)